A heat pump not heating on a cold morning is the kind of failure that feels much more dramatic than it usually is. The outdoor unit is silent or whirring without enthusiasm, the indoor air handler is blowing air that’s room temperature at best, and the thermostat is reading 4 degrees below set point with no sign of catching up. Because heat pumps move heat instead of generating it, their failure modes are different from a furnace’s — a heat pump can run for hours and produce no warmth at all if a refrigerant control, defrost board, or reversing valve is misbehaving. Before you book a $250 HVAC service call, give yourself 30 minutes. A heat pump not heating is almost always one of five things: an outdoor unit iced over from a stuck defrost cycle, a clogged indoor air filter starving airflow, a tripped breaker or a thermostat stuck in cooling mode, a reversing valve stuck in summer position, or auxiliary electric heat strips that have failed to engage on a cold night. Walk through the six checks below before spending a dollar.

Why a heat pump not heating is rarely a “replace the system” problem
HVAC techs see this complaint constantly, and the failure breakdown is remarkably consistent. Roughly 30% of every “heat pump not heating” service call is an outdoor coil so encased in ice that no heat exchange can happen — either the defrost board has died, the defrost thermostat is stuck open, or the unit just had a heavy overnight icing event that exceeded the normal defrost cycle. Another 25% is a filthy indoor air filter or blocked return that has cut airflow across the indoor coil by 40% or more, leaving the coil colder than it should be and triggering low-pressure trip-offs. About 15% is a thermostat issue — either mode set to Cool or Off, a misconfigured smart-thermostat schedule, or a thermostat that isn’t sending the right signal to switch the system into heat. About 15% is a stuck reversing valve, which controls whether the unit pumps heat inside or outside — the most common cause is a frozen solenoid or a control board that never energized the valve when winter started. About 10% is failed auxiliary electric resistance heat strips that should kick in below 35°F outside but aren’t engaging. And only the final 5% is a refrigerant leak or compressor problem. The math is friendly: 95% of these calls are something a careful homeowner can isolate themselves.
Tools you actually need
- A fresh pleated air filter sized for your return grille
- A garden hose with a gentle shower head (for defrosting the outdoor coil)
- A small screwdriver and a flashlight
- A digital thermometer to measure supply-vs-return air temperature split
- The model number from the outdoor unit nameplate (for any parts lookups)
- Warm gloves — this is winter work
Safety note: Cut the disconnect at the outdoor unit before you touch anything mechanical on it. The same caution about confirming dead with a tester from our dead outlet walk-through applies double on a 240 V outdoor unit. Indoor thermostat work is low-voltage 24 VAC and safe to touch.
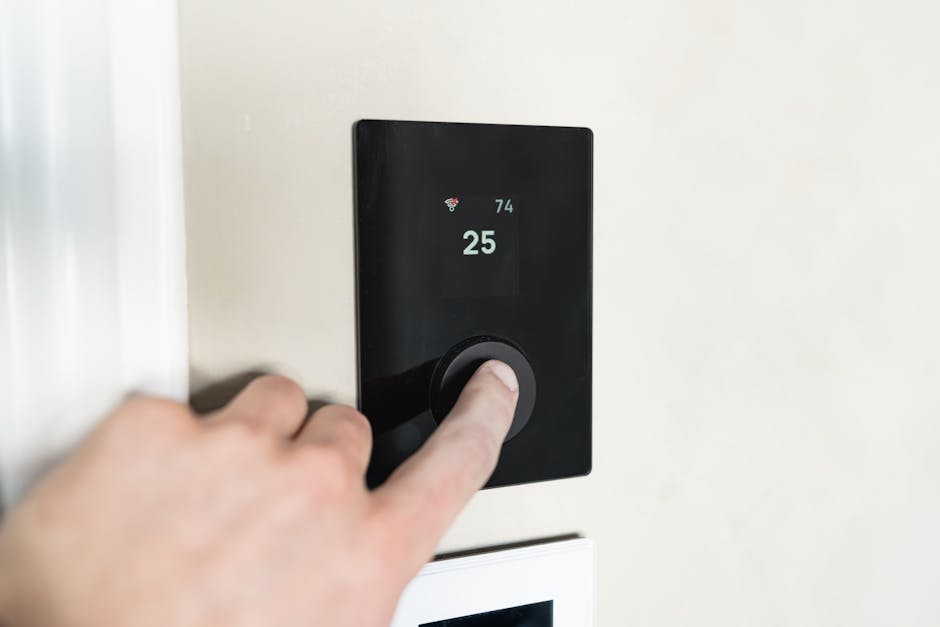
Step 1: Confirm the thermostat is actually calling for heat
This sounds trivial but ends roughly 1 in 5 cases. Walk to the thermostat and verify: mode is set to Heat (not Auto, Cool, or Off), set point is at least 3 degrees above current room temp, the fan is set to Auto, and any “vacation hold” or “schedule override” is cleared. On smart thermostats, also check the Wi-Fi connection — some models go into a fallback mode when offline and silently disable heat. Listen carefully at the indoor air handler: within a minute of bumping the set point, you should hear the indoor fan start and the outdoor unit ramp up. If neither happens, the thermostat signal isn’t reaching the system — check the C-wire and the 24 V transformer the same way we cover in our thermostat walk-through.
Step 2: Replace the air filter and clear the returns
This is the single highest-payoff move for a heat pump not heating diagnosis. A pleated filter that’s 60 days old in a busy household is already half-clogged; one that’s 6 months old can cut airflow by 50% and force the indoor coil so cold that the system trips off on low pressure. Pull the filter, hold it to the light, and look through it — if you can’t see daylight through every square inch, it’s done. Install a fresh filter, then walk every return grille in the house and make sure no furniture, rug, or curtain is blocking it. Also confirm at least 75% of the supply vents are open — closing too many vents to “save energy” actually starves the heat pump and triggers the same failure mode.

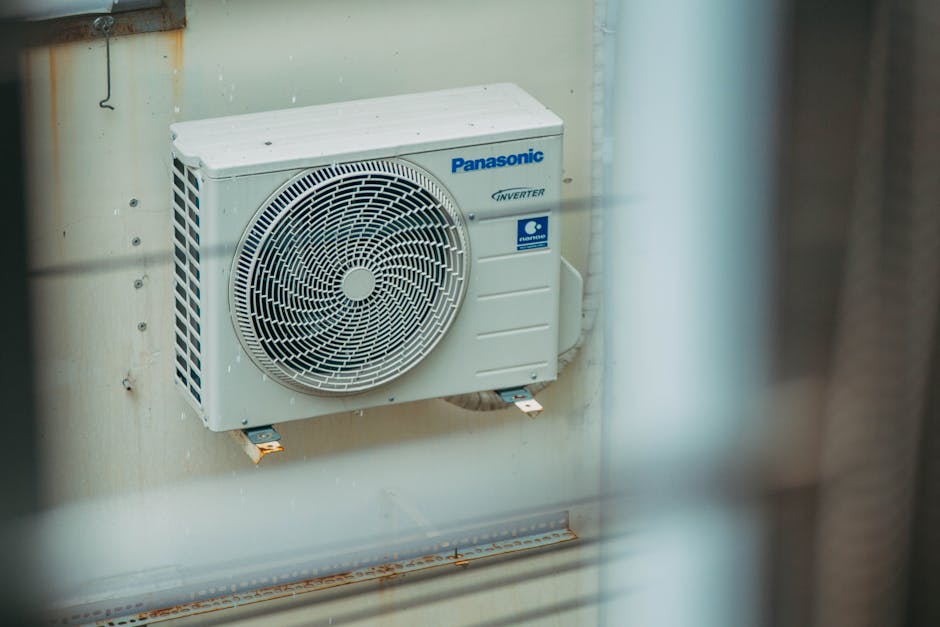
Step 3: Inspect and defrost the outdoor unit
Walk outside and look at the outdoor unit. A healthy heat pump in heat mode has small amounts of frost on the outdoor coil that periodically clears during automatic defrost cycles. An unhealthy heat pump not heating shows a thick block of ice covering the entire coil and sometimes the fan blade. Cut the disconnect at the outdoor unit, then run the garden hose on a gentle shower spray over the coil from top to bottom — lukewarm water clears ice in 5 to 10 minutes without damage. Never use a metal tool or boiling water on the coil; both can puncture or distort the aluminum fins. Once melted, restore power, set the thermostat to Heat, and watch the unit for 30 minutes. If it re-ices within the hour, the defrost board or defrost thermostat is dead and needs replacement — a $50 to $90 part.
Step 4: Check for stuck reversing valve symptoms
If the outdoor unit is clear of ice, both fans are running, but the indoor air comes out cool instead of warm, the reversing valve may be stuck in cooling position. This is the four-way valve that decides whether the heat pump dumps heat outside (cooling) or inside (heating). The fastest diagnostic: with the system running in heat mode, walk outside and feel the copper lines exiting the outdoor unit. The thicker insulated line should feel cold; the thinner uninsulated line should feel hot. If you have it reversed (thicker line hot, thinner line cold), the system is actually running in cooling mode despite the thermostat calling for heat — the reversing valve never switched. Most heat pump reversing valves are activated by a 24 V solenoid that energizes in cool mode and de-energizes in heat mode (or vice versa, depending on manufacturer). The valve is repairable but rarely a DIY job. The diagnostic chain from our AC not cooling walk-through applies here at the opposite end of the same refrigerant circuit.
Step 5: Verify auxiliary electric heat is working
Most U.S. heat pump installations include backup electric resistance heat strips inside the air handler — typically 10 kW or 15 kW — that kick in when the outdoor temperature drops below a “balance point” (commonly 30 to 35°F) or when the heat pump can’t keep up. Turn the thermostat to “Emergency Heat” or “Aux Heat” mode and listen. Within 60 seconds, the indoor fan should run and the supply air should rise sharply — from maybe 85°F on heat pump alone to 110-120°F on aux heat. If aux heat doesn’t deliver this rise, one or both heat strips have an open fuse, a tripped high-limit, or a failed sequencer relay. Each strip has its own breaker in the panel (often a double-pole 30 A or 60 A); confirm they’re all on. The DOE’s heat pump systems guide explains the balance-point logic and why aux heat is essential below freezing. Our furnace not blowing hot air walk-through shares the same supply-vs-return temperature-split diagnostic.
Step 6: When to actually call an HVAC tech
Call a pro only if: thermostat is calling, filter and returns are clear, outdoor coil is defrosted but re-ices in under an hour, reversing valve appears stuck, or aux heat won’t engage despite breakers on — that combination means you need refrigerant pressure readings, valve coil testing, or sequencer relay checks that require gauges and an HVAC license. Also call if the outdoor unit hums but the fan doesn’t spin (failed capacitor, $30 part but in a 240 V cabinet), if the unit short-cycles every 30 seconds (refrigerant or pressure switch issue), or if you see oil residue on the copper lines (refrigerant leak that must be repaired before recharge). Energy Star’s air-source heat pump guidance is the cleanest reference if you’re at the 12-15 year mark and weighing repair against replacement.
One last habit: change the air filter every 60 days during heating season, clear leaves and snow from a 24-inch radius around the outdoor unit weekly, and never set the thermostat back by more than 4 degrees overnight (heat pumps lose efficiency catching up from a deep setback — the math is different from a furnace). Those three rules will keep nearly any heat pump tracking set point through a normal winter and keep “heat pump not heating” from becoming your problem in the first place. The cheapest repair is the one you prevent.
Elena Park covers home electrical and HVAC topics for coverhub.fun. Her background in residential electrical service work — outlets, breakers, GFCIs, central air conditioning, and the steady stream of small failures that send most homeowners straight to a service tech — shapes the way her guides are written: figure out what’s actually wrong first, then decide whether you’re looking at a $0 reset or a real repair.
Elena focuses on the service calls that most often turn out to be DIY-safe: a single dead outlet that’s really a tripped GFCI two rooms over, a thermostat that’s reading wrong, a clogged AC condensate line, or a frozen evaporator coil masquerading as a dying compressor. She’s just as clear-eyed about the work that does not belong in a homeowner’s hands — anything inside the main electrical panel, any sustained burning smell, any breaker that won’t stay reset.
Each piece on her byline gets a final safety pass before publishing. Suggestions, corrections, and reader questions are welcome at editorial@coverhub.fun.