A burst pipe is one of the worst things that can happen to a home, and it happened to my brother in January, around 11 at night. He woke up to the sound of running water that should not have been running. Walked into his hallway and stepped into a puddle. The burst pipe was in the wall behind his guest bathroom, split open from the cold, and water was spraying inside the wall like a busted fire hydrant. He stood there in his socks, completely frozen, with no idea what to do first.
He lost about $14,000 worth of damage that night. Soaked drywall, ruined flooring, three days in a hotel. The plumber’s bill alone was $640 for an after-hours call. The cleanup, insurance deductibles, and replacement materials were the real cost.
The maddening part is that almost all of that damage happened in the first hour, while he was running around in a panic looking for the water shutoff. He found it. Eventually. After about 35 minutes. By then a few hundred gallons had already poured out of the wall.
If you have ever wondered what to actually do when a burst pipe wakes you up at midnight, this article is for you. I have written it as a minute-by-minute burst pipe checklist because that is how this kind of emergency actually plays out. You are not going to be in the mood to read a long article. You are going to want a list you can follow step by step while the water is still coming. So this is that list, plus the part about what comes next and what it should all cost. For background on water damage and home maintenance, the Insurance Institute for Business and Home Safety (IBHS) publishes free homeowner research that is worth bookmarking.
High-CPC Keywords: emergency plumber cost, burst pipe repair, water shutoff valve, water damage cleanup, frozen pipe burst, water damage restoration, water leak homeowners insurance.
Minute 1 to 2: Shut Off the Water on the Burst Pipe (Find Your Main Valve Now)
Everything else is secondary. Until the water is off, every second the burst pipe stays open is costing you money. A half inch burst pipe at typical home pressure can dump 4 to 8 gallons of water per minute, and 200 gallons of water inside your walls is a problem you will be paying for for months.
Where Your Main Shutoff Actually Is
Stop reading this article right now if you do not know where your main water shutoff is. Go find it. Today. Walk around your house with a flashlight until you find it. You will save thousands of dollars by knowing where this valve is before you need it.
In most American single-family homes, the main shutoff is in one of these spots: in the basement on a wall facing the street, in a utility closet on the ground floor, in a garage attached to the house on a wall facing the street, or in a crawl space accessed through a small door. In warmer climates with no basements, it is often outside near the front of the house, in a small plastic box in the ground with a metal lid, sometimes marked “water.” In condos and apartments, the shutoff may be only inside a service closet that you can access, or it may require building maintenance to operate.
The valve itself looks like one of two things. Either a round wheel handle (older style, called a gate valve) or a lever handle (newer style, called a ball valve). Lever valves are great because you turn them only one quarter turn and they are off. Wheels can take fifteen or twenty turns clockwise to close completely.
Turn It the Right Direction
Righty tighty, lefty loosey. To shut the water off, turn the valve clockwise (to the right). If it is a wheel, keep turning until you feel it stop, then back off a tiny bit so you do not strip the valve seat. If it is a lever, push it 90 degrees so it is perpendicular to the pipe. The lever should be sitting across the pipe when off.
After you turn off the main, walk back to a faucet and try to run the water. If a little dribble comes out and then nothing, you did it right. If water keeps flowing strong, the valve did not seal, and you may need to call your water utility’s emergency line to shut the water off at the street. Most utilities will come within an hour for a burst pipe emergency, free of charge, because they want the water bill to stop too.
If You Cannot Find or Turn the Main Valve
Older valves can seize. If you turn yours and nothing happens, do not force it past the point of obvious resistance. You can crack the valve body, which is worse than the original burst pipe. Instead, find the secondary shutoff for the appliance or area that is leaking. Toilets, sinks, washing machines, and water heaters all have their own little shutoff valves right behind them. If you can get the burst pipe leak isolated to one fixture, you have bought yourself time.
For the absolute worst case, the meter has its own shutoff. Most home water meters are in the ground out by the curb under a metal cover, and the shutoff is a small valve you turn with a special key called a water key. They are about $10 at any hardware store and worth having in your garage just in case. Slide the key into the slot, give it a 90 degree turn, and the water to your whole house is off.
Minute 3 to 4: Cut the Power If the Water Is Near Anything Electrical
This is the step people skip because they are focused on the water. Do not skip it. Water and electricity together kill people. Even if you have shut off the water already, standing water can still be in contact with outlets, lamp cords, the water heater, the dishwasher, the furnace, or any of a dozen appliances you do not normally think about.
When to Kill Power Right Away
If you can see water touching any of these, throw the main breaker on your panel before you do anything else with the water:
- An outlet, either on the wall or the floor
- A wired-in appliance like a dishwasher, washer, oven, or furnace
- The water heater itself
- Any lamp cord lying on a wet floor
- A baseboard heater
- A floor outlet (these are common in older living rooms)
Your main breaker is the big one at the top of your panel, usually labeled “MAIN” or just sitting alone above the two columns of smaller breakers. Push it firmly to the OFF position. Yes, this will plunge your house into darkness. Use your phone flashlight. The dark is annoying. Getting shocked is potentially fatal. It is not a hard choice.
If the water is contained to a non-electrical area, like a bathroom with no outlets on the wet floor, you can leave the power on for now. But the moment water starts spreading toward anything electric, kill the main breaker. Better safe than sorry on this one.
If Someone Is Already In the Water
If you walk into a flooded room and someone is already standing or lying in the water and any electrical device might be involved, do not step into the water yourself. Kill the breaker first, then go in. People die every year from rushing in to help a family member during an electrical accident. Stop, breathe, and cut the power before you take another step.
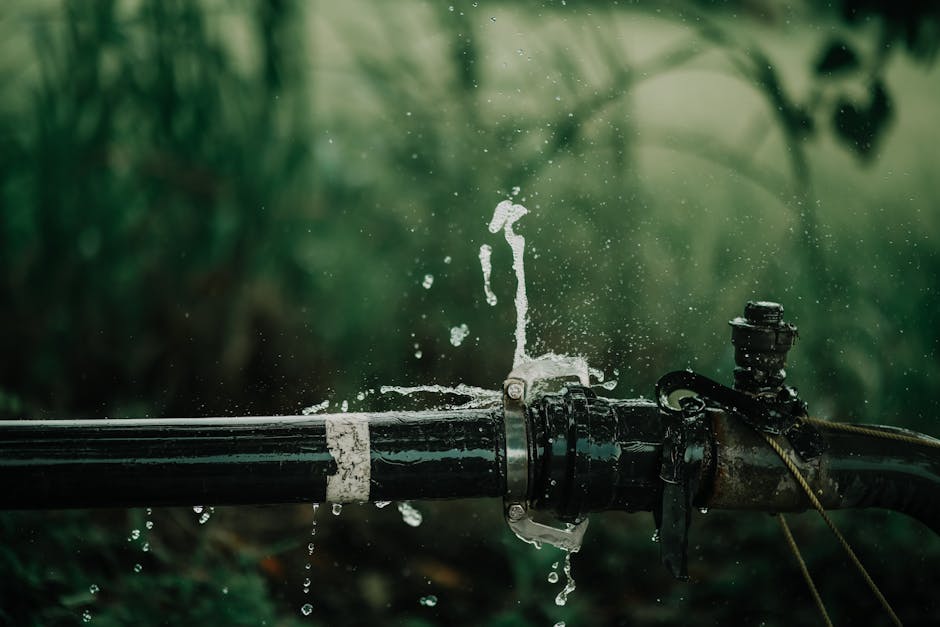
Minute 5 to 7: Find the Burst Pipe and Stop the Spread
Now that the water is off and the power is off if needed, you have about three minutes to figure out where the burst pipe actually is and contain the damage that is already in motion.
Trace the Burst Pipe Source
Look at the wettest spot first. Water travels downhill, so the wettest spot is usually below the actual leak. If you see water dripping from a ceiling, the burst pipe is somewhere above it, possibly in an attic or between floors. Follow the wet trail upward. If you see water coming from a wall, run your hand along the wall to find the wettest point. Cold water lines are usually under sinks, behind toilets, and behind washing machines. Hot water lines are usually near the water heater and run to the kitchen, the bathrooms, and the laundry.
For a fully open burst pipe, you will often hear hissing, dripping, or a steady running sound even after you have shut off the water, because the residual pressure and water in the line keeps draining out for a few minutes. Use your ears as much as your eyes.
Catch What You Can
Grab every bucket, pot, large bowl, and garbage can you own. Put them under any active drip. If the leak is in a ceiling, do not let the ceiling sag with water weight, because a saturated drywall ceiling will collapse and spray water everywhere when it goes. If you see a bulge in the ceiling, poke a small pencil-sized hole in the lowest part of the bulge with a screwdriver, and put a bucket under it. Yes, you are intentionally putting a hole in your ceiling. That hole costs $20 to patch. A collapsed ceiling costs $2,000 to replace.
Move Stuff
While the water is still draining out of the pipe, move what you can. Pull rugs back, pick up papers, lift furniture legs onto blocks or paper plates so the legs do not wick water up into the wood. Move electronics first. Photographs and books second. Soft furniture third. Hardwood floors are usually salvageable if you can pull water away from them within the first hour. After an hour of soak, you are looking at full replacement.
If the water has gotten into carpet, lift the corners and look at the pad underneath. Soaked carpet pad is almost always replaced. Carpet itself can sometimes be saved with professional drying.
Minute 8 to 10: Document Everything (Your Insurance Will Thank You)
I know this feels like the last thing you want to do when there is still water everywhere. Do it anyway. The next ten minutes you spend documenting damage will be worth thousands of dollars to your homeowners insurance claim.
Photos and Video, Lots of It
Pull out your phone and take video. Walk through every affected room slowly. Narrate as you go. “This is the hallway. You can see water on the floor here, water staining on the wall here, the leak appears to be coming from this wall here.” This kind of casual narration is gold for an adjuster. It captures the timeline, the source, and the extent without any prep work.
Take still photos too. Wide shots of each room, then close ups of every wet spot, every damaged item, every soaked rug, every ruined book. Photograph the burst pipe itself if you can see it, and the water on the floor, and any visible damage to walls or ceilings. Take photos of your meter and your shutoff valve, just to show you took the right steps.
Save Receipts From Right Now
If you stopped at Home Depot for buckets, save the receipt. If you booked a hotel because the house is uninhabitable, save that receipt. If you bought a fan to start drying out the floor, save the receipt. Most homeowners policies include “additional living expense” coverage and “loss mitigation” coverage, which reimburse you for reasonable expenses you incurred while protecting the home from further damage. The keyword for the adjuster is “mitigation.” You mitigated. You stopped further damage. That is something your policy pays you for.
Call Insurance Before You Call a Restoration Company
When you call your insurance company, they will usually recommend a “preferred” water damage restoration contractor. You do not have to use their guy. You can pick your own. But calling insurance first means they will document your claim from the start, assign a claim number, and tell you what your policy actually covers. Some policies cover the full restoration. Some only cover the damage, not the source of the leak. Some have a deductible of $1,000, some have $5,000. You want to know all of this before you sign anything with a contractor.
The Temporary Burst Pipe Fix (Buy Yourself 24 Hours With $7 in Supplies)
If you can isolate which burst pipe is leaking, and the water is now off, there is one thing you can do to buy yourself time before the plumber arrives. This is not a permanent burst pipe repair. Do not try to make it one. But it can be the difference between a calm wait for the plumber and a wait where water keeps dripping out of the wall every time you flush a toilet.
The Hose Clamp and Rubber Patch Trick
For a small pinhole leak or a hairline crack in a copper pipe, the cheap fix is a piece of inner tube rubber wrapped around the pipe and held in place with one or two stainless steel hose clamps. You can buy hose clamps at any hardware store for $1 to $2 each. A few feet of rubber from an old bicycle tube costs nothing if you have one in the garage, or about $3 for a plumber’s repair patch from the hardware store.
Wrap the rubber around the cracked area, making sure it covers about an inch on either side of the leak. Slide a hose clamp over the rubber. Tighten the clamp screw down hard with a screwdriver. Add a second clamp if the leak is more than an inch long. This is a temporary repair that will hold for hours or even days against normal household pressure.
Pipe Repair Putty for Tougher Cracks
For a larger crack or split, a stick of pipe repair epoxy putty is your friend. They sell it at every hardware store for $5 to $8. It looks like a tube of caulk but it is a two-part epoxy you knead together in your hands. Once kneaded, it has about 5 minutes of working time and then hardens like rock.
Dry the pipe first as much as you can with a towel. Knead the putty until it is one color. Press it firmly around the crack, smoothing the edges down. It will harden in 10 to 15 minutes and you can turn the water back on in an hour. Again, this is temporary. The plumber will replace the section of pipe properly. But this gets the house running again so you can flush a toilet and have water to drink while you wait.
When Not to DIY the Fix
If the pipe is plastic (PEX or PVC), if the crack is at a joint, if water is coming from inside the wall and you cannot get to the pipe, or if you are not totally confident, do not patch it. Leave the water off and wait for the plumber. A bad DIY patch under pressure can blow off and cause more damage than the original leak.
When to Call the Emergency Plumber (and What It Should Cost)
For a real burst pipe in your house, you are calling someone the same night. There is no version of this where you wait until Monday. Emergency plumbers exist for exactly this burst pipe situation, and you should call one the moment the water is off and you have done your documentation.
What Emergency Service Should Cost You
After-hours, weekend, and holiday rates are about double the daytime rate. Standard plumber rates run $100 to $200 an hour in most of the country, with most charging a one-hour minimum on a service call. Emergency rates run $150 to $350 an hour, with a typical service-call minimum of $150 to $300 just to walk in the door. Add parts and any pipe replacement and you are usually looking at $400 to $900 for a single burst pipe repair done at midnight on a Saturday.
That sounds like a lot, and it is. But compare it to one more hour of water flooding into your wall. A few hundred dollars in plumber fees versus a few thousand in water damage from an open burst pipe. The math works out.
How to Pick a Plumber at Midnight
Look for these three things: a real local address (not a national 800 number with no physical office), license info posted on their website or vehicle, and a written quote before they start work. Avoid anybody who quotes you a per-hour rate but refuses to give a ceiling. Honest emergency plumbers will tell you on the phone roughly what the visit will cost, give or take. The scammers say “we cannot tell until we see it” and then bill you $1,800 for a $400 job.
If your insurance is going to cover the work, ask the plumber for an itemized invoice. Adjusters need the line items. A single number on a piece of paper will get the claim sent back to you with questions.
The whole point of this article is the same point I made in our kitchen repair guide and our dead outlet troubleshooting guide. Most home emergencies are not as bad as they look in the moment. A burst pipe at midnight feels like the end of the world. But if you can find the main shutoff in two minutes, kill the power if needed, document the damage, and call a real plumber, the actual cost is a tiny fraction of what it could have been. The damage from a burst pipe is mostly done in the first hour, and you are the only person who can stop it in those first ten minutes. Save this checklist on your phone. Walk through your house tonight and find your shutoff valve. You will sleep a little easier knowing where it is. For an in-depth post-event recovery reference, the American Red Cross flood recovery guide is a solid next read.
Marcus Reed is coverhub.fun’s lead contributor on home plumbing and water-system repair. Drawing on more than a decade of hands-on residential service work — supply lines, drains, fixtures, and the kind of emergency leaks that wake a family up at 2 a.m. — Marcus translates the diagnostic playbook that professionals run on every call into language a homeowner can follow at the kitchen sink. His guides walk through the safe, fast checks worth doing before you reach for the phone, plus the exact red flags that mean it really is time to bring in a licensed plumber.
He focuses on the high-cost emergencies that most often catch people unprepared: burst pipes, running toilets that quietly inflate water bills, kitchen drains that back up at the worst time, and shut-off valves no one can find when water is already on the floor. Every guide is written from a ‘try this first’ mindset, with clear safety stops along the way.
Marcus is also the editorial fact-checker for coverhub.fun’s plumbing category. If you have a fix that worked at your house and isn’t covered yet, or a correction on something that is, email editorial@coverhub.fun and he’ll take a look.